And here's my house this morning :)
Isn't it pretty? Sigh. I love the first snow. I made a card to celebrate the occasion justing this adorable Winter Bunny stamp from Lawn Fawn and using some Papertrey Ink Dies (Mat Stack 4 and Victorian Lace Border).
I colored the cute little bunny with copics and some colored pencils (for the sled) and then masked him and the hills off with paper and inked the sky with Tumbled Glass Distress Ink. After I peeled up the masks, I accented the hills with silver Stickles and added some glitter "snow." Isn't he adorable?
Here were the colors of Copics I used:
Supplies: Cardstock- Papertrey Ink (Vintage Cream, Kraft, and Pure Poppy), Dies- Papertrey Ink (Mat Stack 4 and Victorian Lace Border), Ink- Tsukineko (Memento Black) and Ranger (Distress Ink in Antique Linen and Tumbled Glass), Stamps- Lawn Fawn (Winter Bunny, Frosties), Glitter Glue- Ranger (Silver Stickles), Markers- Copics.
Next, I wanted to share with you a few storage solutions I've come up with lately. I always love seeing how people organize their supplies; it gives me ideas for scrappy and non-scrappy organization. I did a post and video a while back about my studio space overall, but this is a little update. :) Note: Click on any of the photos to see them bigger.
My ink labeling system. I simply printed the labels off of Ranger's site for my Distress Inks (I've accumulated quite a few now- I think I'm up to twenty oh my favorites now). When I bought my most recent ink loves, Jenni Bowlin Studios inks by Ranger, I decided to do a similar system but with the colors on the outside. I'll go back and do this for my distress inks someday, but for now, this works for me.
I keep my inks on the corner of my desk. This way, they're in reach and I can see all of the sides to choose the one I want quickly.
This is a closer look at my JBS inks. Aren't they pretty? I love seeing the colors on the side like this!
Stepping back from my desk, you can see the usual set up that I work with. I keep my craft spinner in front of my inks (which can easily move out of the way when I need to reach an ink pad), my little craft tools caddy, and a plastic cup full of other pens and tools next to my crafting surface.
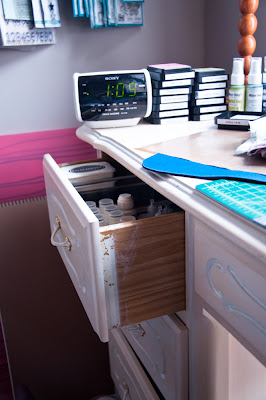
Next to me, I have my stamping and glitter drawer. (I bought this desk off of Craigslist, and then my wonderful mother refinished it for me.) The inside of it looks like this:
Toward the front of the drawer (the lefthand side in this picture), I have my paint daubers, my stickles, glitter, and smaller ink pads in a small square organizer I bought from Target (in the Itso storage area). Then I have my ink pads stacked up by brand along the side and middle of the drawer. Standing on end are my big acrylic blocks, and behind the glitter box is a small metal container for my tiny blocks so I don't lose them in my drawer.
This beauty is next to my desk on my wall and is made using this rail from Ikea and these clips, also from Ikea. I love it, and the whole thing cost me under 20 dollars for the ability to hand 75 packages of stamps. I'm also thinking about hanging my thin dies up there, but I might just get another rail to go above this one. We'll see. :)
These storage bins are also from Target (the Itso storage section, once again) and hold my stamps from Papertrey Ink in their CD cases, Stampin' Up! sets in their DVD cases, and other SU! cases that hold my smaller Hero Arts cling sets.I labeled my PTI sets with some Vintage Cream cardstock and a pen. It's so simple, but it makes finding the set I want to use so much easier. Love it. :)
Here are my clings stored with the label in the sleeve and the stamps showing on the back.
The other basket on top of my Sterillite rolling cart holds all of my wood block stamps.
Next to my desk are two more (also Itso) bins that hold my adhesive and ribbon.
Here's a closer look into my ribbon box. I have my PTI ribbon toward the front (the right) on the bottom, my neutral colors of ribbon in the middle, and my favorite specialty ribbons in the next row. On top of that, I have my twine, silk ribbon, and a row of Washi Tape (ordered from PrettyTape).
I hope you liked this little look into my organization system. Leave a comment if you have any questions about any of the things in the pictures! I have to go do a couple of laps around the house to warm up and put on some makeup for the first time this weekend. Ha. Maybe I'll even get a but of scrapping done tonight. Woohoo! I'm itching to play with Napa Valley soooo badly.
Love.
Brit
P.S.- *GIVEAWAY* Don't forget to comment on this post from Wednesday to be entered to win a fabulous necklace! I'm drawing the winner tomorrow :)


5 comments:
Super sweet card, love that bunny, and thanks for all the photos of your craft room and the wonderful photos of the snow. Hugs!
oooh love your scrap space!! i need to photograph/post mine but i never think about it untill it's a mess lol.
thanks for sharing
xo
OMG such an adorable card! ..I wish it snowed where I live, I love the snow!
Oh my goodness, your pictures of the snow is fabulous, giving me chills but it's so beautiful looking! I love the sweet card - especially that neat edge of the Victorian lace border!!
enjoyed seeing your scrap space and storage ideas! Always fun to see what others are doing!
Post a Comment