A Note from Brit

Thank you for stopping by my blog! I have now moved over to my own domain for more room to grow, so make sure to check my new site and blog out at brittaswiderski.com. :)

Tuesday, November 30, 2010

Meet Our New Roommate.

Life is still super crazy around here. I have have a huge project for my graphic design class due tomorrow, so today I'm busy working on that. I hope to get some time tonight, though, to finally unpack, make some scrappy things, and cat-safe my room. What? Cat safe? Oh, right. We got a cat! It belongs to the two brothers that I live with, it's seven weeks old, and we don't have a name for her yet. (I would LOVE to hear any suggestions you have for naming her!) I just met her about 12 hours ago, and I'm so in love with the little pumpkin. She's freaking adorable. Want to meet her, too? Okay:
 Here she is. She's spotted on her right side and striped on her left. :)
 She's ridiculously playful. She thinks all feet are toys. Thankfully, her bites and claws don't hurt yet. Ha.
 She is TINY. She was the runt of the litter. She's about the size of a beanie baby (I kid you not!). For a size comparison, that futon bar is 7 inches off the ground. Yeah. Tiny. And adorable.
 This is her chair. She has claimed it in the living room. :)

I just can not tell you how absolutely thrilled I am to have this little, adorable, sweet kitty around. I'll try not to overload you with kitty pictures and stories over the next couple weeks, but I don't know if I can resist.


Leave ideas for names if any come to mind. The boys want to name her Miss Nezbit (from Toy Story) or  Nezzy for short. I'm not to crazy about that name, so let's come up with something better! Haha. If we use the name that you suggest, I'll send you a sweet prize (cat and cat hair not included). Hehe.

Promise to be back to regularly scheduled programing tomorrow.

Love.
Brit

Monday, November 29, 2010

Week 12 - Monday Video Tutorial: Colored Pencil

Hello and welcome to another Video Tutorial Monday. Firstly, I wanted to thank you for all of the sweet birthday wishes yesterday. It makes my heart so happy! The crafty world is truly the best. I'm in the midst of packing up this morning and flying home this afternoon back to Minneapolis. I had a wonderful time at home with my family, but it's definitely time to go back and get lots of work done. The next three weeks are going to be absolutely insane for me with final projects and finals coming up way to quickly, so I may be posting only a few times a week instead of 5 or 6. Don't worry, though- as soon as finals are over, I'm sure I'm going to want to relax by making lots of pretty things. :) Of course, I'll be working on my December Daily and probably posting that a couple times a week. My Instax Mini is waiting at home for me, so I can't wait to break it out and start this project. 

Anyways, back to VTM. I wanted to expand on my earlier videos about coloring with colored pencils, so I made this one about adding depth to images that already have "pre-determined" colors. For example, this wreath image. You basically have the choices between reds and greens, no matter how you slice it, so I show you how to make plain coloring really pop by blending lights, mediums, and darks. Here's today's card:

And the video. (Watch it on YouTube, subscribe to my channel.)
Supplies: Cardstock- Papertrey Ink (Kraft), Stamps- Lawn Fawn (Bows and Holly), Colored Pencils- Prisma (48 Color), Ink- Tsukineko (Memento Black) and Ranger (Vintage Photo Distress INk), Glossy Accents- Ranger, Scoring Board- Martha Stewart (EK Success).

By the way, this is the set of colored pencils I have:
You can buy them here on amazon or at my favorite art supply store, Dick Blick (with a mail-in rebate offer for purchases over $50), but I wouldn't buy them for more than 40 dollars. I think I bought mine for $30 at Michaels when they were 50% off. They go on sale every once in a while, and you can usually use a coupon on them. I like this set a lot as a good range of color, but I have picked up some extra individual colors for specific drawings that I had to do for class. I hope someday to accumulate the whole collection, but we'll see how that goes. These pencils are awesome quality and will last a very long time, so I highly recommend them. As far as art supplies go, these are definitely a good investment.

Of course, plain old Crayola pencils would work too. If you have those and want to try this technique with those, just make sure to color lightly on the bottom layer. They're not as easy blend since there's more wax in them, but if you color lightly, you should be fine.

If you have any other questions about colored pencils, feel free to comment here or on the video. I'd love to answer or point you in the right direction of some resources. Thank you for stopping by today! I have to dash off to start packing. Ha.

Love.
Brit

Sunday, November 28, 2010

It's My Birthday...

So I'm giving myself the day off from doing a fantastic post and instead posting a couple pictures I took of my home time this morning. While out to take a box of things to a friend to bring back to Minnesota for me (I can't bring everything on the plane with me- that would be insane!), I took pictures that represent memories. I think I'll make a mini book with the pictures. :) I also did this:
I bought my first bottle of champagne. The cashier wished me a happy birthday. I liked it. :) (I may have also picked up a bottle of mudslide on the rocks mix. It looked yummy.) Big day!
Around the town #1: The terrible faux Statue of Liberty sitting in our business district. It's ten feet tall, chubby, and very out of place. It was put in two years ago, and I just don't get it. It's a fun thing to laugh about, though. They... tried. Ha.
#2: Roundabouts. We have 4 or 5 around town now, and this is the most recent one. It's a double one, and it works like a charm. I love them.
#3: My street. This is what I see when I know I'm finally home. Lovely.

I'll be back tomorrow with regularly scheduled posting (including the Video Tutorial Monday), but for now, I'm off to go spend time with my family. Thank you for stopping by today!

Love.
Brit

ETA: This was the sunset tonight. Glorious. :)

Saturday, November 27, 2010

Bon Voyage?

While I'm away in Illinois until tomorrow, I thought I would post this quick card I made using another Imaginisce collection- Splash Dance. I had this Studio G stamp (from Michael's a year or so ago) that I had wanted to make a card with for a while, so this was my chance. This would be great for a friend or family leaving on a cruise (maybe a last plea to take me with them? haha). Here's what I made:
11-26-10 Bon Voyage Card-1
I used the rub ons from this collection to decorate the kraft piece. I hadn't used rub-ons in a while, so this is definitely a little bit outside my comfort zone. I think it turned out pretty well, though.
11-26-10 Bon Voyage Card-2
I love this patterned paper, so to draw attention to the scallops, I cut along them and then inked the edges with Tumbled Glass Distress Ink.
11-26-10 Bon Voyage Card-3
Supplies: Cardstock- Papertrey Ink (Antique Linen, Kraft, and Aqua Mist), Patterned Paper- Imaginisce, Ink- Ranger (Tumbled Glass Distress Ink) and Tsukineko (Memento Black), Twine- Papertrey Ink, Buttons- Papertrey Ink (Aqua Mist), Rub Ons- Imaginisce, Stamp- Studio G.

I can't wait to be back to Wisconsin (and normal internet access!) tomorrow; then I'll be able to do a recap of Thanksgiving and give you a full review on how the Pumpkin Bread Pudding went. Happy Black Friday! Hope you get (or got) all the deals you wanted this morning. I've gone every year for the past 5 (and most of them before that), so I definitely feel like I'm missing out this year since I'm in the middle of nowhere. I guess online shopping will have to suffice. Hehe.

Love.
Brit

Thursday, November 25, 2010

What I'm Thankful For.

It's Thanksgiving today in the US, and as I'm stuffing my belly full of turkey, mashed potatoes, and all sorts of pie, I wanted to take a second and tell you some things I am grateful for.

1. That I have so many great bloggy and crafty friends that provide such great, valuable feedback. I'm still amazed that some people actually like to look at things I make. Haha.
2. That this industry is so great. The vast majority of everyone who crafts, stamps, and scraps is so incredibly nice. I'm so thankful for nice people.
3. That I can be with my family for the beginning of the holidays and get to go back to my friends back in Minneapolis to finish off this semester strong.
4. That I've been blessed with the means to go to school and continue pursuing my passions.
5. That I'm able to share my creativity with you and the world. It's my release, my passion, and my therapy.  It truly is a blessing.

So thank you SO much for stopping by today and other days and always being so kind, encouraging, and inspiring. You truly rock.

Today, I wanted to share two cards that I created with the same collection- the Imaginisce Love & Cherish Collection. They both use this paper, one just uses the A side and the other the B side.
11-25-10 Thinking of You Card -1
Since the black is glossy, I simply inked over the white parts with distress ink in various blues and purples and then wiped off the excess.
11-25-10 Thinking of You Card -2
Supplies: Cardstock- Papertrey Ink (Simply Chartreuse and Vintage Cream), Patterned Paper- Imaginisce, Ink- Ranger (Distress Ink in Broken China, Tumbled Glass, Dusty Concord, Milled Lavender) and Tsukineko (Black Memento), Punch- EK Success (Real Estate Label Punch), Ribbon- Papertrey Ink (Aqua Mist Satin Ribbon), Gems- Queen & Company, Stamp- Hero Arts (CL140 Thinking of You Messages).

11-25-10 Happy Anniversary Card-1
On this one, I used the B side of the patterned paper and cut out a circle toward the top using my Large Circle Nestabilities. I then inked several of the flowers (also from the same collection from the same Imaginisce Love & Cherish collection) with the same inks I used above on the paper and then added them to the card with American Crafts brads and some extra rhinestones.
11-25-10 Happy Anniversary Card-2
To make the circle pop a little more, I sewed around the edge with purple embroidery floss and tied it in a bow on the right hand side. The overall feel of this card is elegant with a cutesy touch. Love it!
11-25-10 Happy Anniversary Card-3
Supplies: Cardstock- Papertrey Ink (Simply Chartreuse and Spring Moss), Patterned Paper- Imaginisce, Ink- Ranger (Distress Ink in Broken China, Tumbled Glass, Dusty Concord, Milled Lavender) and Tsukineko (Black Memento), Die- Spellbinders (Large Circle Nestabilities), Flowers- Imaginisce, Gems- Queen & Company, Rhinestone Brads- American Crafts, Embroidery Floss- DMC, Stamp- Lawn Fawn (Sophie's Sentiments).

Hope you enjoyed this little spin on one product, two ways. What are you thankful for this holiday season?

Love.
Brit

Wednesday, November 24, 2010

My December Daily 2010 Cover.

The other day, I sat down and got to work on my cover for my December Daily. (If you want to learn more about this project, you can read my post here or go over to Ali Edwards' blog here.) I'm getting more and more excited to get started on this album when I get home from Wisconsin. My Instax Mini is waiting for me to start clicking away, and I picked up some binder rings (1.5" and 2.5") to hold my book together. I pulled out my Circa 1934 6 x 6 pad, cut out some strips of my favorite patterns (two red, and one black), and got out some stickers from October Afternoon and chipboard numbers from Basic Grey's Oliver collection. Here's what I came up with:
11-24-10 December Daily Cover-1
I inked the edges and chipboard with Vintage Photo Distress Ink to keep with the look of the rest of the album.
11-24-10 December Daily Cover-2
Supplies: Patterned Paper- Cosmo Cricket (Circa 1934 6 x 6 pad), Letter Stickers- October Afternoon, Chipboard Numbers- Basic Grey, Ink- Ranger (Vintage Photo Distress Ink).

I'm on my way to Illinois to have Thanksgiving dinner at my grandparents' house. Let's hope the "too much family" aspect doesn't get too out of hand. Whenever we visit my grandparents, things always seem to go a little crazy. Ha. Happy almost Thanksgiving to my American friends! I'm going to try and make this Pumpkin Bread Pudding from the Pioneer Woman and Bobby Flay battle. It looks delicious, so I hope it turns out well. I consider myself a good cook, but baking doesn't always work out for me. My brother who's in culinary school right now may need to come to my rescue. I'll let you know how it goes ;)

Love.
Brit

Tuesday, November 23, 2010

Home Again.

I flew in yesterday, and I can not tell you how happy I am to be home with my family again. I haven't been back since August, so it's been an insanely long time. My trip yesterday was fairly interesting- it started off with a flight delay but ending up being more about watching the sunset and the moonrise from above the clouds and meeting someone pretty awesome (an opera singer from Pittsburg... super cool!). It's just so great to be back. In fact, today I did my ritual shopping trip: the ten minute drive up to Appleton to visit Archiver's, Hobby Lobby, Jo Ann Fabrics, and Michael's, stopping for a lunch of Baked Potato Soup + sourdough bread at Atlanta Bread Company. It's my ideal "me day", and I scored lots of awesome deals. (Uhhh... hello Fiskars cloud punches for 40% off!) When I get back to Minneapolis, I'll probably do a haul video with the things I know I have waiting at home for me. Here's a picture I took of my baby, Blue Eyes, this morning:
 Today, I wanted to share a layout. This is another one featuring pictures from Australia. I bet you're getting sick of these pictures, but don't worry! I just placed a huge order for all my prints from the last 8 months, so I'll have new scrapping material very soon. I pulled out my Napa Valley kit and came up with this:
 I love all of the layers here:
 I wrote the words and then went over them with a paper piercer and threaded them with cream thread. I like the look.
 I love this doily ribbon from Basic Grey.
Supplies: Kit- Studio Calico (Napa Valley), Cardstock- Papertrey Ink (Vintage Cream), Pearls- Queen & Company, Ink- Ranger (Vintage Photo Distress Ink), Marker- Copic (.3 Tip), Thread- DMC, Tape- PrettyTape on Etsy.

Hope you enjoyed the layout for today. I'm off to go eat some meatloaf (my favorite home meal!) and relax. Wishing you happy, lovey travels!

Love.
Brit

Monday, November 22, 2010

Video Tutorial Monday #11 - Using Distress Inks

Good morning! I'm just popping in to post this morning before leaving for the airport. I can't wait to get home! It'll be so nice to be back in Wisconsin for a week or so. Loveeee. Anyways, the idea from today's tutorial came to me after reading on a couple places on the internet that people have collected the Tim Holtz Distress Inks for the pretty colors but didn't really know what to do with them. To them I say: watch this video! Hopefully you'll get a sense of what you can do with them. I show three of my favorite distress ink techniques. Here's today's card:
 Close-up of the three inking techniques together:
 The pretty twine bow. I think it adds the perfect touch. :)
Here's the video for this week. As always, you can watch it on youtube here. (And make sure to subscribe to my channel! :) )
Supplies: Cardstock- Papertrey Ink (Vintage Cream), Stamps- Hero Arts (CG170 Wildflower Garden), Studio Calico (Grid Stamp), Lawn Fawn (Sophie's Sentiments), Ink- Ranger (Distress Inks- Shabby Shutters, Peeled Paint, Crushed Olive, Dried Marigold, Spiced Marmalade, Worn Lipstick, Mustard Seed, Dusty Concord, Milled Lavender), Tsukineko (Versamark), Embossing Powder- Ranger, Twine- Papertrey Ink, Corner Rounder- WRMK.

Thank you for stopping by for another video tutorial Monday! I have to dash off to catch my flight, but I'll be posting more pretty things this week. I have one of my new favorite layouts to share with you tomorrow. :)

Love.
Brit

Friday, November 19, 2010

A Layout. (I'm too tired to come up with a creative title.)

I think the header says it all. Long week, long day, long everything. By the way, it totally sucks that it gets dark at like 4:30 now. Why, world do you do this to me? I don't like that. I needed some creative therapy last night, though, so I sat down and scrapped. I pulled out my Studio Calico November kit, Napa Valley, and got to work. Here's what I came up with:
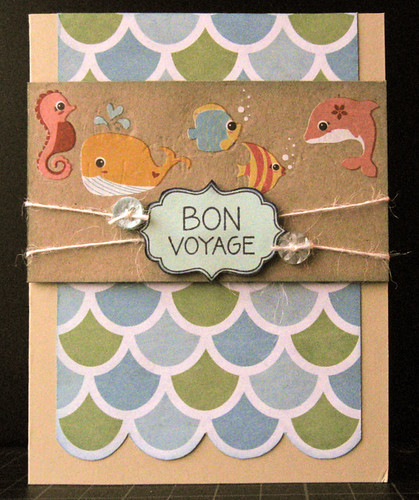
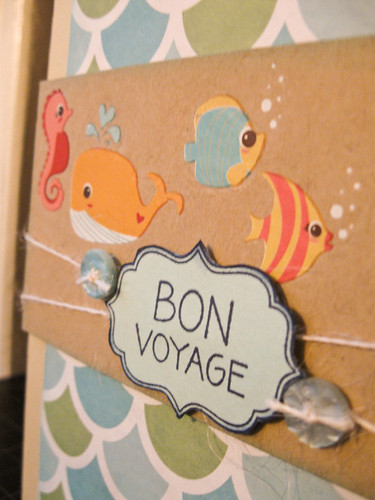
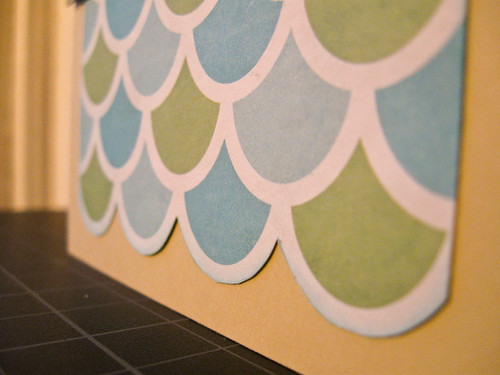
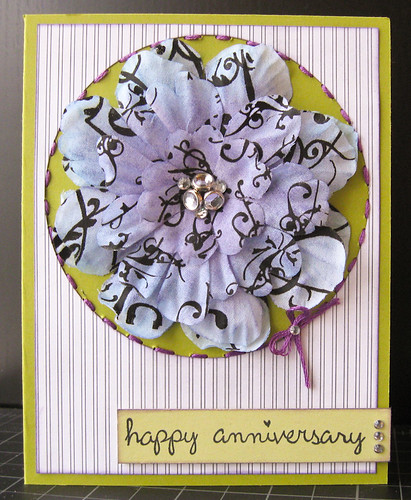
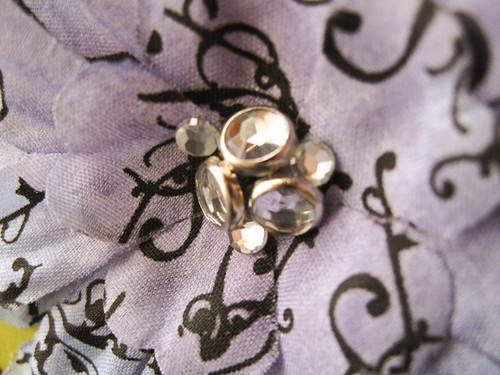
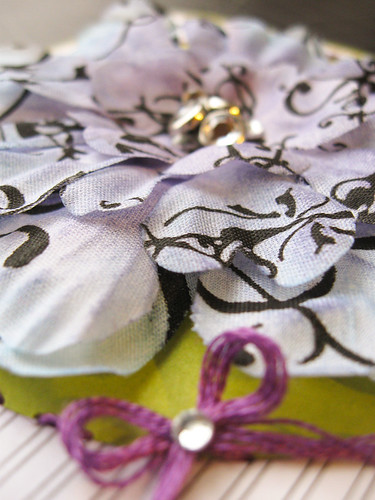
My goal was to resist my temptation to ink all edges. I did! And because of it, I think the layout came out more... streamlined?.... like I wanted it to. This line of gems was by far the most time-consuming part of the layout. I placed the biggest ones first (every inch), the smallest ones in the middle of those, and the medium ones in the between the large ones and the small ones. Easy to do but tedious. The pearls are from Queen & Co.
 My super messy handwriting. I don't care, it's how I write. :)
Supplies: Kits- Studio Calico (Napa Valley (Ledger Paper) and Santa Cruz), Cardstock- Papertrey Ink (Vintage Cream), Black Pen- Copic, Star Punch- Stampin' Up!, Pearls- Queen & Co.

By the way, I've decided what I'm going to pack for my week long trip home. I thought you might be interested... I'm just thinking like how I would pack for a crop. :)

1. Kits- Napa Valley, Santa Cruz
2. Past Kits- On the Easel, Still Life
3. Inks- JBS Spice Tin and Malted Milk, Ranger Vintage Photo + Distressing Tool, Memento Black
4. Standard tools- Paper Trimmer, Cutterbee Scissors, Tonic Scissors, .3 Copic Micro Liner, White Gel Pen, Brown Marker, Tombow Tape Runner, Foam tape, Mini Glue Dots, Bone Folder, Paper Piercer, Corner Chomper
5. Needles and Thread (Cream and White)
6. Cardstock- Cream, White, and Kraft in 12 x 12 and 8.5 x 11
7. Stamping tools- 2 x 3 acrylic block, Sophie's Sentiments (Lawn Fawn)
8. Pre-stamped images on Vintage Cream cardstock and my Prisma colored pencils (for idle coloring for easy cards later)

That's it. Okay, so I might add one or two more things. (Am I missing any essentials here? Not sure. But I will be within 5 minutes of 4 crafting stores, so I think I just may be alright. Hehe.)

Off to go eat dinner with the boyfriend. Yayyy for hot dates at Applebee's.

Love.
Brit

Thursday, November 18, 2010

One of My Favorites.

Recently, Hero Arts asked on its blog what our favorite stamps sets of the year were. Without hesitation, I found myself typing "Delicate Blossoms." I guess I didn't realize that I loved it so much until that point. It's gorgeous... so I decided I needed to give it some more love. Here's the stamp set:
 And here's what I created with it:
I simply cut a 1.75" by 5.5" piece of kraft cardstock, stamped the thinner image on it, and colored it in with Copics. Add a little distressing with Vintage Photo ink, and you're all set with the main image. Super simple!
Supplies: Cardstock- Papertrey Ink (Kraft and Fine Linen), Stamps- Hero Arts (CL449 Delicate Blossoms) and Lawn Fawn (Sophie's Sentiments), Markers- Copics (YG17, R35, YR18), Ink- Ranger (Vintage Photo Disress Ink) and Tsukineko (Memento Black), Gems- Making Memories (Paper Reverie Collection in Sienne, Gems & Brads), Twine- Papertrey Ink, Corner Rounder- WRMK.

I'd like to thank you all for such sweet comments yesterday. You all rock! I can't wait to share my December Daily adventure with you. :) I'm off to go spend "t.v. Thursday" with the roomies (our favorite lineup of shows- Community, 30 Rock, The Office, Always Sunny, The League, and Conan- are all on) and get some crafting done. I also need to start packing for home. Trying to fit enough stuff to scrapbook with in a carry-on is going to be a challenge for sure. Haha.

Love.
Brit

Wednesday, November 17, 2010

My December Daily 2010 Setup.

I've never done a December Daily before, but I wanted to give it a try this year. Ali Edwards posted earlier this week with a place to link to foundation pages blog posts and I thought, "Hmmm... yes, maybe I should start this thing before the first day of December. Good idea, Ali." So I sat down last night and figured this whole thing out. This is what I'm going to do:

Page size: 4.25" by 5.5"
Base pages: Kraft Cardstock from Papertrey Ink
Distressing: Edges inked with Vintage Photo Distress Ink of all elements

With that background, here you can see what I came up with.

The Covers
 This is the front. It's plain chipboard covered in patterned paper on the front and Vintage Cream cardstock on the inside. I'm going to decorate it someday. Maybe today? Ha.
This is the back. I wanted to use this pattern, but it was too busy for what I wanted to do inside the book, so I threw it on the back. Side note: I'm using twine to tie the book together right now, but I'm planning on using binder rings once I can get ahold of some.

The Inside
I'm using this wonderful, wonderful 6 x 6 Circa 1934 Collection pad by Cosmo Cricket. I pulled out a sheet of 12 of my favorite patterns and got to work cutting them down like this:
After I cut the papers apart, I inked all the edges and then adhered them to the pages of my book, alternating horizontal spreads and vertical spreads.


I have these pieces for leftovers + the rest of the paper pad. I LOVE these colors for Christmas. They're so elegant and don't scream "Christmas!!!" in your face. They're perfect.

The Layout
This is the way my pages are going to be set up. Base + photo + number + accent/journaling.
That perfectly-sized white piece of paper representing the photo is the same size as the prints from the Pink Instax Mini 7S that I ordered today from B&H Photo and Video. I can't wait to get it! It'll be perfect. (Note: they also have the best prices on Mini refills that I've found. Only 13.75 for 20 exposures.)
I'm also going to be using these stamps (Natalee by Studio Calico) for the numbers. I figure stamps would be easier (and cheaper) than letter stickers.

There you have it. I'll keep you updated as I decorate the cover and get started on my December Daily. This is going to be a challenge to myself; I'm not really the type of person who can stick with the same thing every day consecutively. Wish me luck!

I need to go make pretty things. I fly out to go home on Monday and will be gone for a whole week, so I have lots of work to get caught up on before I leave.

Love.
Brit

P.S.- If you're looking to get into the Christmas mood (I am!), you should check out the Glee Christmas album that came out yesterday. It's wonderful. :)

Tuesday, November 16, 2010

The big 2-1.

Being a Junior in college right now means that all of my friends are turning 21 this year. This is the kind of birthday that requires a card :) I can't wait until more of my girl friends start turning 21... oh, the martini glasses I will make! Today is one my boyfriend's roommate's birthdays. His name is Matt (just like my bf), so everyone calls him by his last name, Domski. It's a pretty sweet last name if I do say so myself. Here's the card that I made for him:
 I'm excited to give him it to him tonight. :)
Supplies: Cardstock- Papertrey Ink (Kraft), Patterned Paper (October Afternoon - Seaside Collection 8 x 8 pad), Ink- Ranger (Jenni Bowlin Studios Spice Tin and Tim Holtz Chipped Saphire), Stamps- Hero Arts (CL340 Birthday Sayings) and Lawn Fawn (Bake Me a Cake), Number Stickers- Basic Grey (Manilla Basics Micro Mono Stickers, Inked with Spice Tin ink), Corner Rounder- WRMK.

I'm feeling motivated today to get lots done. On my list: get two design projects ready for printing, write a graphic design history paper, and start my December Daily foundation pages. I've decided that I'm going to invest in a Pink Instax Mini 7S camera to take the pictures for it. It'll be instant, sized perfectly, and super funky. I can't wait! Hopefully, tomorrow I'll have some progress to share with you. :)

Love.
Brit