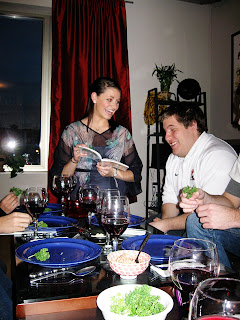
I'm putting a little pause on the blogging marathon for now. I have a ton of things to share with you, but life got NUTS all at once. Nothing bad, just crazy, normal life :) I'll be back hopefully towards the end of the week or weekend to give you a recap. In the meantime, share links with me of your favorite blog. I would love to be more inspired :)
Love.
Brit
Tuesday, April 6, 2010
Friday, April 2, 2010
Day Six.
A. As it turns out, parking your car within 5 feet of the end of a driveway in Minneapolis gets it towed... oh no! Well, we have one of my roommate's brothers and his two friends visiting us this weekend, and they didn't exactly know this law. Hence, we are now aware of where the impound lot is in the city. Ha, learning experiences, right?
B. Have you seen this? I'm kind of obsessed with this adorable barn owl and her little tiny babies. You can watch them any time of day in their box, and it's so amazing. It would be a great thing for kids to watch, too. :)
C. Today's card.
Super simple card today, but I just wanted to use the lace stamp with black ink. The fire-colored butterflies add a vibrant feeling to the card.
1. Color the butterflies with two colors each, fading the colors in as you go towards the other color and filling any white spaces in with the lighter color, then cut the butterflies out.
2. Put everything on with pop dots to add dimension and to make the butterflies "flutter".
3. Use a white pen to draw around the edges to pull everything together.
Here's the close-up:
Love it. Simple, easy, and elegant- my favorites. Tomorrow's card should be fun... I'm thinking some emboss resist fun? Yay! See you tomorrow for day 7 of our little marathon.
Love.
Brit
Thursday, April 1, 2010
Day Five.
A. How adorable are these pillows? Jen from Tatertots and Jello made these, and they're absolutely gorgeous. This is definitely going on my project to-do list.
B. Make sure to check out Courtney's new May Arts ribbon in her Practicing Creativity Designs store. I'm in love, and yes, I placed an order last night. :) I love supporting bloggie friends! Seriously, check out her store. You won't be disappointed. This ribbon definitely rolled its way into my cart last night... yum!
C. Today's card.
This thank you card utilizes many of the same products as yesterday's card but gives off a different vibe. I love the way the Plum Pudding ink looks on the Vintage Cream cardstock. Soooo pretty.
1. Lesson learned- for super detailed background stamps like this, it's best to used your fingers to hold it very securely in place and then carefully brayer over it. This took me a few tries to get the hang of it, so I have several blurry pieces of puple lace lying around on my desk :/
2. The pearly dots are Liquid Pearls from Ranger. My tip (from Jennifer McGuire's Thinking Inking class for Two Peas) is to put a dot of the Liquid pearls where you want them, and then lightly tap the back or side of the card to smooth out the tops. I'm still working on the finesse here- these are too flat for my liking, but I think they'll do.
3. One color in two different shades + a neutral or two = the quintessential simple, elegant card.
And now it's ready for its close-up:
Goodness, that lace stamp is gorgeous. You're going to have to hold me back from using it on everything. Seriously.
Hope you enjoyed day five! See you tomorrow for some more inspiration in my blogging marathon.
Love.
Brit
Day Four.
More to come on that later as I plan more. :) Any suggestions on where to visit in Sydney? I would love to hear some if you've been there before!
B. Pictures from the Seder on Monday. It was such an awesome learning experience; I'm so glad to have people in my life to inform me about other people's perspectives and ways of life. Since I'm not an expert on Seder or Passover, I'll link you to some information here. And, actually, here's a link to the article about the Seder at the White House that happened at the same time as ours. So cool!
Jen's homemade Seder Plate.
Our table set up for 14 people in our living room.
Mahzoh- the unlevened bread that is Kosher for Passover. The Jewish people at our Seder said they could tell who was Jewish and who wasn't by how much they liked the Mahzoh- us experiencing it for the first time liked it because it's not the only carb we could eat for the week of Passover. :)
Jen leading our service. She did a wonderful job explaining everything to the 11 of us who had never been to a Seder before. Don't I have a gorgeous roommate? :)
C. Today's card.
This is for the CardPatterns challenge this week, hosted by Hero Arts. Here's the sketch:
Here's a little run-through of what I did:
1. I used paper to mask off the middle area and stamp Hero Art's Lace Background Stamp in Vintage Cream in over the card base. It adds a subtle and elegant texture. I love this, but next time I'll do it on paper that's a little darker next time so it stands out a little bit better.
2. I used scor-tape to stretch across the card on the outsides of the masked off space and cover it with glitter for a little definition.
3. Then I added the Dahlia, the sentiment, and the ribbon in a triangle for visual balance.
Here's the close-up:
Supplies: Cardstock: Papertrey Ink- Vintage Cream and Aqua Mist, Ink- Colorbox Chalk Ink (Brown) and Papertrey Ink (Vintage Cream), Ribbon- Offray, Glitter- Martha Stewart, Adhesive- Scor-Tape, Stamps- Hero Arts (Lace Background S5341) and Papertrey Ink (Delightful Dahlia).
Okay, hope you enjoyed day four, even if it is thirty minutes past midnight. Oops! Haha see you tomorrow for day five of fun!
Love.
Brit
Subscribe to:
Comments (Atom)


